The Excel Macro Recorder is a very useful tool included in MS Excel VBA. With the Excel Macro Recorder you can record a task you perform with Excel. You can execute the task over and over with the click of a button which can save you a lot of time.
The Macro recorder records every step you execute with Excel. This is good news if you want to automate repetitive tasks. All you have to do is record a specific task once.
The Macro Recorder comes as a great help when you don’t know how to write VBA code from scratch.
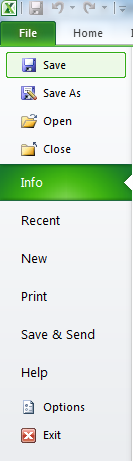
To record, run and edit a recorded macro, follow the below steps:
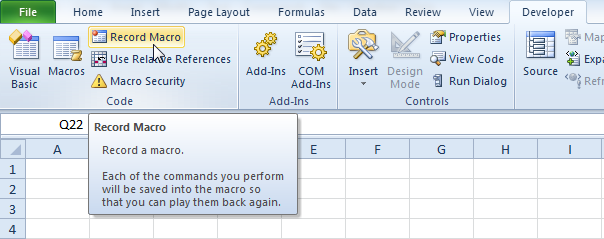
1. Click on the Developer tab
2. Click on Record Macro. See the picture below. Each of the commands you perform will be saved into the macro.
3. Here you can give your macro a name and you can enter a shortcut for your macro (both are optional). Whenever you create new macro a new module is created under worksheets. This modules can be seen through Visual Basic Editor ( read How to use Visual Basic Editor in Excel VBA ?)
There are 2 options to save your macro:
i. you can store the macro in the module within the workbook or
ii. you can store the macro in Personal Macro workbook
If you choose to store your macro in Personal Macro Workbook, the macro will be available to all your workbooks (Excel Files). This is because Excel stores your macro in a hidden workbook that opens automatically when Excel starts. If you choose to store your macro in New Workbook, this will create a new workbook and the macro will be saved in the same. If you choose to store your macro in This Workbook, the macro will only be available in the current workbook.
4. Click on OK.
We will now record a macro that changes the format of Cells to Number with zero decimals.
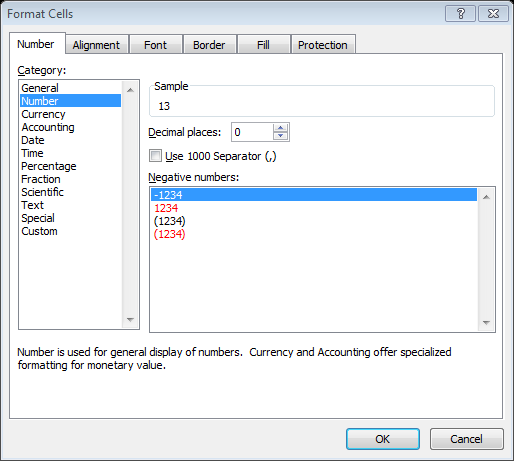
5. Right mouse click on the active cell (selected cell). Be sure not to select any other cell! Then click on Format Cells…
6. Choose Number format, change Decimal places to 0 and click OK.
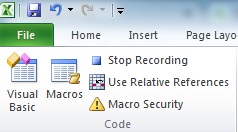
7. Click stop recording
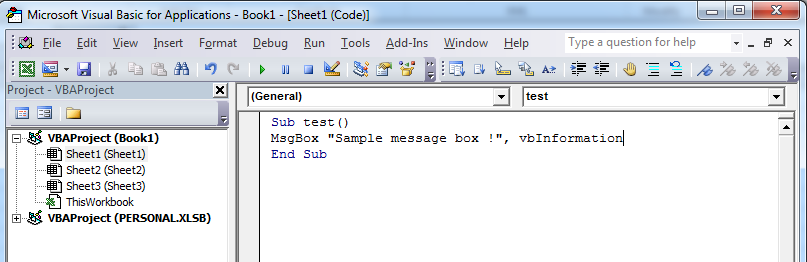
8. Open Visual Basic Editor by Clicking on Visual Basic in above image or using key board shortcut Alt+F11
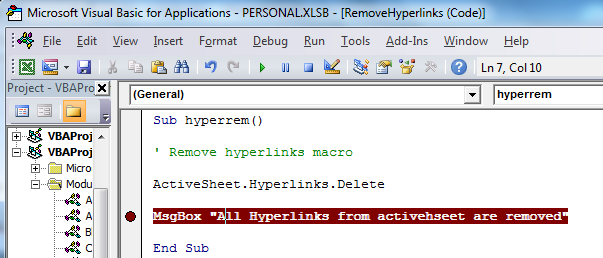
9. I had named the macro as test, when we clicked on record macro. you will see the below code in VBA module.
Sub test() ‘ test Macro
Columns(“A:A”).Select
Selection.NumberFormat = “0.00” End Sub
10. Close the visual basic editor and return to your excel sheet. Enter some sample data, like i have updated below under column A:
7.28
6.56
6.80
6.24
7.68
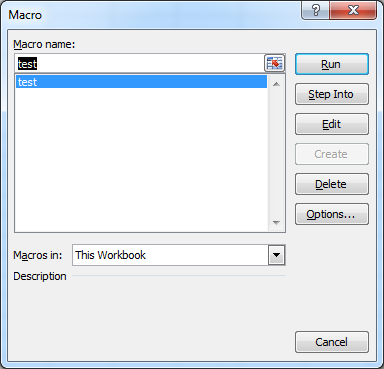
11. To run our macro to get the desired output we have programmed, Click Macros (refer image in point 7) or use keyboard shortcut and press Alt+F8. This will open a pop-up window as shown below.
12. Choose macros in This Workbook if it is not selected by default, as we have chose to save the macro under current workbooks module. Now you will able to see available macros in the current open workbook. In above screenshot you can see the only available macro is test, which we just completed recording.
13. Select test and click on Run button, this will execute the recorded macro and we can see the output in column A (where we have entered the sample data).
7
7
7
6
8
So i hope, the above post will help you to record your own macro, edit using the VBA editor, save it and run repetitive tasks to avoid manual errors and improve efficiency.
There are two ways to view the already recorded macro.
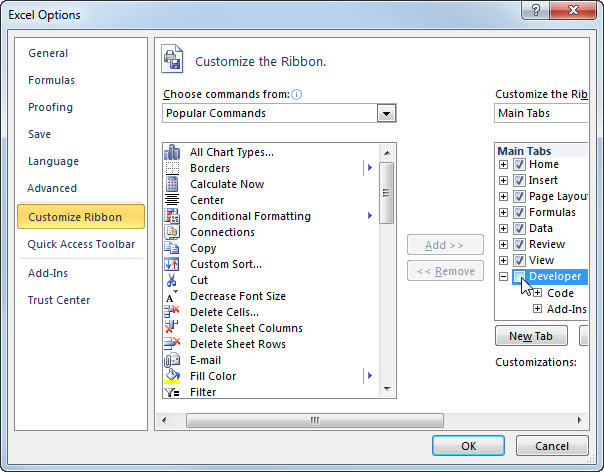
1. You can click on Macros from the Developer tab (if you are not able to see the developer tab, you need to enable it from options menu) and then click on Edit. The Visual Basic Editor will appear.
2. You can directly open the Visual Basic Editor by clicking on Visual Basic from the Developer tab (or press Alt+F11).
The created macros are placed into a modules, which can be renamed as per your requirements, the default name is Module1, Module2 and so on.
You can also place the code on any of the Sheets, in this case the macro will be available only for particular sheet. While the macro created in the module is available for all the sheets in the workbook.
To manually run the code step by step, press F8. pressing F8 on keyboard, will run each line at once and move to next step. This will help you to check if your written code does not have any error.
To run the code till particular step, you need to break the code for this, put your cursor on the line where you need to put break and press F9.
Once you press F9, the line color will be changed to brown selection. In case you have a long code and you made few changes in middle of that code. The F9 feature can save your time to test that particular line of codes.
When you press F9 the line color is changed, which means it acts as a pause of the macro at that step. So when you run this macro, the execution will stop where you had presses F9.
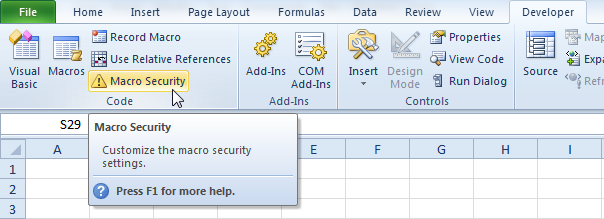
You need to set up the macro security settings correctly to protect yourself against potential viruses. Make sure your macro security settings are set up correctly so that they may not create any harm to your computer.
To set up the macro security settings in Excel 2010 or Excel 2007, follow the below steps.
1. Click on Developer flight –> Click on Macro Security.
2. Here you have four options.
i. The first option will disable all macros
ii.The second option will always ask you to enable a macro
iii. The third option will only allow macros with a digital signature to run, and ask you to enable others
iv.The fourth option will enable all macros.
I recommend to use the second security level if we are downloading Excel files from the internet or unknown sources, more frequently. With this security level we can always disable the macro if we don’t trust the owner of the Excel file.
We can use the fourth security level only if you are creating the macros and testing them. With this security level we don’t have to always enable macros.
An object has properties and methods. Excel Visual Basic is a semi-object oriented programming language. Learn more about the object hierarchy of Excel Visual Basic.
In Excel VBA, objects, properties and methods are connected with a dot. Properties are something which an object has (they describe the object), while methods do something (they perform an action with an object).
What is Excel VBA Property ?
Let’s take a look at an Excel VBA object and an Excel VBA property. We will use the Range object and the Formula property. The Range object is nothing more than a cell (or cells) on your worksheet.
We already know from Excel that a cell can contain a formula.
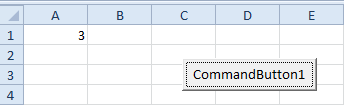
1. Place the value 10 into cell A1.
2. Create a command button.
3. Add the line:
Range(“B1”).Formula = Range(“A1”) * 2
4. Execute the macro. This macro places the formula into cell B1 and the result will be calculated (20).
What is Excel VBA Method ?
We will use the Range object again and the ClearContents method.
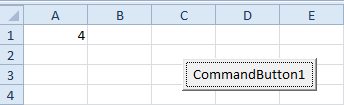
1. Place the value 10 into cell A1.
2. Create a command button.
3. Add the line:
Range(“A1”).ClearContents
4. Execute the macro. Cell A1 is now empty!
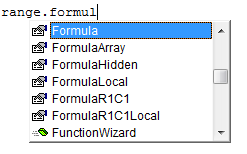
How to see all the properties and methods of an object ?
The Range object has many more properties and methods. Want to see more?
1. Launch the Visual Basic Editor.
2. Type in: Range.
3. A list will appear showing you all the Excel VBA methods and properties of the Range object. The fingers are the properties and the green boxes are the methods of the Range object.
Workbook and Worksheet:
The Worksheet and Workbook object have properties and methods as well, such as the count property which counts the number of active workbooks or worksheets. The Workbook and Worksheet object are commonly used in Excel VBA. They are very useful when your macro code has to be executed on different workbooks or worksheets.
What is Object Hierarchy ?
Now that we have seen the Range object, we can understand the Workbook and Worksheet object better. In Excel Visual Basic each object can contain another object, and that object can contain another object, etc. In other words, Excel VBA programming involves working with an object hierarchy.
The main hierarchy of all objects is Excel itself. We call it the Application object. The application object contains other objects. An example of an object of the Application object is the Workbook object (Excel File). This can be any workbook you have created. The Workbook object contains other objects, such as the Worksheet object. The Worksheet object contains other objects, such as the Range object.
We have used the following code line a lot:
Range(“A1”).Value
but what we really meant was cell A1 on the first worksheet of Book1. Thus we should actually add the following line in Excel VBA:
Fortunately we do not have to add a code line this way. This is because Excel Visual Basic knew we meant Book1 and the first worksheet because we placed our command button there (remember?). Now also remember the automatically created module when we recorded a macro with the Excel Macro Recorder. Code placed into a module is available to all workbooks and worksheets.
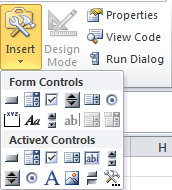
Place the Sub test into a module (In the Visual Basic Editor, click on Insert and then Module).
Sub test()
Range(“A1”).Value = “code placed here”
End Sub
Execute the code (Click on Macros and then Run, or click on Run from the Visual Basic Editor). The words “code placed here” will be placed into cell A1.
Now go to the second worksheet. Execute the code again. You will see that the words will be placed on the second worksheet as well!
Now even open a new workbook and execute the macro again. You will see that the words will be placed there as well! That is because we didn’t specify a workbook or worksheet name and Excel VBA automatically takes the active workbook and active worksheet. Be aware that if you want to change different things on different sheets to include the Worksheet object
Below are few Properties and methods of the Workbook and Worksheet object :
You may have noticed that worksheets and workbooks are both plural (see the complete code line mentioned earlier). That’s because they are actually collections. The Workbooks collection contains all the Workbook objects that are currently open. The Worksheets collection contains all the Worksheet objects in a workbook.
You can refer to a member of the collection, that is: a single workbook or single worksheet, in two ways. Using the index number, Worksheets(1) is the first worksheet starting from the left. Using the member’s name: Worksheets(“sheet1”).
Below are few examples.
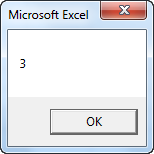
1. The Count property of the Worksheets collection and Workbooks collection. The following code line counts the number of worksheets of a workbook. Place a command button on your worksheet and add the code line:
MsgBox Worksheets.Count
Result when you click the command button on the sheet:
You can also use the Count property to count the number of active workbooks.
2. The Add method of the Workbooks collection and Worksheets collection. The following code line creates a new worksheet.
Worksheets.Add
You can also use the Add method to add a new workbook.
3. The Worksheet object contains more interesting collections, such as the Rows collection. In Excel VBA you can use the Select method to select a row. The code line below selects row 2
Worksheets(1).Rows(2).Select
In a similar way, you can select a column. The code line below selects column 7.
Worksheets(1).Columns(7).Select
What is Application Object ?
The mother of all objects is Excel itself. We call it the Application object. The application object gives access to a lot of Excel related options.
The mother of all objects is Excel itself. We call it the Application object. The application object gives access to a lot of Excel related options.
We can access almost any Excel function through the Application object.
1. For example, place a command button on your worksheet and add the following code line:
When you click the command button on the worksheet, Excel VBA calculates the average of the values in Cell A1 and Cell A2 and places the result into cell A3.
instead of Application.WorksheetFunction.Average
we can also use
WorksheetFunction.Average
There are many more worksheet functions you can use in Excel VBA.
1. Launch the Visual Basic Editor using Alt + F11
2. Open any one module
2. Type in: worksheetfunction
3. A list will appear showing you all the worksheet functions available
You can find many worksheet functions and make proper use on them, as and when needed, while writing codes.
To create a database we would need MS Access application installed in our system. But we can create a database using the following code, without using MS Access application.
To make this happen, Microsoft has created an Microsoft ActiveX Data Objects Extensions library for Data Definition Language and Security. It is in short called as ADOX.
You would need to add the references in Excel VBA editor, before using the ADOX.
————————————————————————————————————————–
Sub createdb()
‘define filepath variable as string, this string will contain DB creation path and DB name Dim filepath As String
‘assign the folder path and db name
filepath = “C:\Users\Default\Desktop\Test.accdb”
‘define catalog variable as object, which will work to set the ADOX catalog Dim Catalog As Object
‘assign the ADOX.Catalog object to our variable Set Catalog = CreateObject(“ADOX.Catalog”)
‘Executing the code to create the MS Access database
Catalog.Create “Provider=Microsoft.Jet.OLEDB.4.0;” & _
“Jet OLEDB:Engine Type=4” & “;Data Source=” & filepath & “”
‘Done. Database with name “Test.accdb” has been created in the filepath location
End Sub
————————————————————————————————————————–
you can directly copy paste the above code in VBA module, to create a new db. All you need to do is change the filepath value above. e.g.
filepath = “C:\Users\UserName\Desktop\New.accdb”
Also, you can assign the value to file path by entering the path in Excel cell. see example below:
filepath = Sheet1.Range(“A1”).Value
while in A1, we can give the path C:\Users\UserName\Desktop\New.accdb.
By assigning the filepath value from range(“A1”), we don’t need to open the VBA editor to change the path.
I have tried to answer few queries you might have, after going through the above code. For any more queries, you can reply or comment on this post.
What is ADOX.Catalog ?
For creation of the database, we need a catalog object provided by the ADOX library. In order to get access to the all the objects, you need to specify the the ADOX.catalog using the new catalog variable.
Which library references do we need to add ?
Microsoft ADO Ext. 2.7 for DDL and Security.
What is Microsoft.JET.OLEDB.4.0. ?
This code works as an provider for all the tasks related to MS Acess db
‘Define the variables to be used in the VBA code Dim connectdb As String, pathdb As String, connObj As ADODB.Connection
‘Assigning the database name and the connection path to the pathdb variable
pathdb = Sheet1.Range(“A2”).Value
‘In the above case the reference is taken from Range A2 of sheet 1, while we can directly add the path in VBA code e.g.
pathdb = “C:\Users\Default\Desktop\Test.accdb”
‘Connecting to the database and creating new table Set connObj = New ADODB.Connection
With connObj
.Open connectdb
.Execute “CREATE TABLE TEST_TABLE ([COL1] text(50) WITH Compression NULL, ” & _
“[COL2] text(200) WITH Compression NULL, ” & _
“[COL3] datetime NULL)” End With
‘ Table with name “TEST_TABLE” will be added to the database, with 3 columns listed in above code
End Sub
————————————————————————————————————————–
You can add as many columns you want to add in the above code. This code can be directly copied to Excel VBA editor and executed with few tweaks like:
1. Changing the pathdb
2. Changing the required column names
3. Changing the required table name