‘Define the variables to be used in the VBA code Dim connectdb As String, pathdb As String, connObj As ADODB.Connection
‘Assigning the database name and the connection path to the pathdb variable
pathdb = Sheet1.Range(“A2”).Value
‘In the above case the reference is taken from Range A2 of sheet 1, while we can directly add the path in VBA code e.g. ‘pathdb = “C:\Users\Default\Desktop\Test.accdb”
‘Connecting to the database and creating new table Set connObj = New ADODB.Connection
With connObj
.Open connectdb
.Execute “drop table TEST_TABLE” End With
‘ Table with name “TEST_TABLE” will be deleted from the database
End Sub
Please note that this function will permanently delete the table and its content, which will be no more recoverable.
Please use this function with caution.
If you check out my other post regarding, How to create table in MS Access using Excel VBA, you will find that only the .Execute line is changed. Anything you enter withing the double quoted after .Execute “” will be executed on the database by the VBA code.
This concludes that, you can use the above connection method and procedure to execute different queries like UPDATE DATA, DELETE DATA, EXPORT DATA and more.
Insert new module and copy and paste the below VBA code.
Sub split_text()
‘——————–Define Variables which we are using in the macro—————————– Dim indata As String Dim i AsInteger, j As Integer Dim out As Variant Dim endrow As Integer Dim splitSymbol As String
‘———————-Set values to the variables we need to user—————————————
‘Set the split symbol, using which we need to split the data
splitSymbol = “>”
‘Find the last row of the data in Sheet 2. Using which we will run a loop starting from row number 2 to end row. In older versions of excel update 65536 instead of 1048576
endrow = Sheet2.Range(“A1048576”).End(xlUp).Row
‘ There are 2 loops in below code. First is to loop through the rows of the data and second within the cell to split the data
For j = 2 To endrow
‘assign the data to indata variable, which we need to split. here A acts as column and j as a row number
indata = Sheet2.Range(“A” & j).Value
‘you can directly put symbol in code or assign the value as listed below out = split(indata, “>”)
out = Split(indata, splitSymbol)
‘The split value is assigned to out. While the UBound function below will detect the maximum number from the out string, which we need to split. i.e. this number will define the number of columns in which data will be populated and the below for loop will run for the same number.
For i = 0 To UBound(out)
‘Below code will post the output in the row assigned to j variable and i will act as column
Cells(j, i + 1) = out(i) Next i
Next j
‘This will pop up the message box, once the data split is processed. It will say # of rows data processed successfully
MsgBox j & ” rows of data split process completed sucessfully !”, vbInformation
End Sub
Please copy the above code to your vba module and test the same. Do let me know if you want any more information on the same.
If you want to super hide the worksheets in excel, excel has an very hidden property.
When the sheets are very hidden, if you right click and try to unhide such sheets, the unhide view gets disabled. As there will be no worksheets to view.
Use the below steps to test the very hidden property of the excel sheets.
Open new worksheet
Press Alt + F11 to go to VBA editor window
Insert new module from the project explorer
Copy and paste the below code to try out:
Sub SuperHide()
‘This property will super hide the sheets
Sheet1.Visible = xlVeryHidden
End Sub
We will not be able to unhide this sheet1 from excel window. For that we would need to write a vba code for unhide.
Sub UnHide()
‘This property will unhide the sheets. True over here reprents the xlSheetVisible property
Sheet1.Visible = True
End Sub
This will unhide the sheet and you will be able to see the same in excel window.
You can add multiple sheets in a similar way and use both the hide and unhide codes for different uses. If you don’t want to super hide the sheet, you can also use the below code to just hide the sheet.
Sub Hide()
‘This property will simply hide the sheets. False over here represents the xlSheetHidden property
Sheet1.Visible = False
End Sub
This will hide the sheets and in this case, you will be able to unhide the sheet from the Excel Window.
You can also use the below keyboard shortcuts to hide or unhide sheets for faster use. Hide – Alt, O, H, H
Unhide – Alt, O, H, U
Just in case if you don’t want any one to go in VBA code and unhide the super hidden sheets. You can protect the VBA module with password of your choice.
If you are building a macro and don’t want any one to modify it. You have an option in Excel VBA editor, using which you can protect your VBA module code.
Open a new excel file
Go to Visual Basic Editor Window.
Insert new module and add a sample code to it.
Sub SampleCode()
Msgbox “This is a sample code we need to hide !”, vbInformation
End Sub
Follow the below steps to protect the VBA module:
Click on Tools
Click on VBA Project Properties
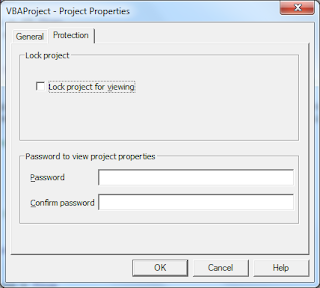
The VBA object properties window will pop up. On this window, select the Protection Tab.
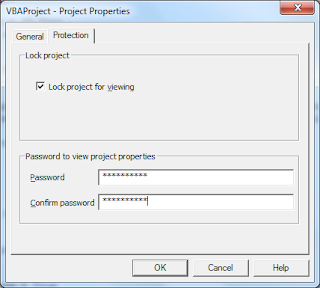
Tick the Lock Project for viewing check box.
Enter the password of your choice in two fields, Password and Confirm Password.
Click OK and we have just protected the VBA module. Save and close the workbook. Open it again to check the protection.
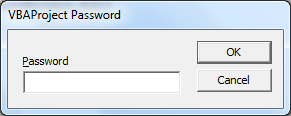
Go to VBA module, all modules will be hidden and if you double click on it will ask you the password to unprotect.
VBA stands for Visual Basic for Applications. It is a programming language provided by Microsoft, to create applications or develop macros. VBA is a free tool, which comes along with the Microsoft office package, which we can use to develop programs in Excel, Word or PowerPoint platform.
VBA is widely used with Excel to create macros to automate the repetitive tasks. Tasks which consumes lot of manual efforts, which can be automated using the VBA macro. We can write a set of instructions in VBA code to execute the repetitive tasks, fast and more accurately without any manual intervention. Few people also call these macros as Robots. which do their tasks without resting and they can rest for the time the robot is doing their job :-).
Please note that VBA and VB are different from each other. By using VB (Visual Basic), you can create applications which are standalone and executable. While VBA needs support of Microsoft office applications to develop and run macros.
Excel from Microsoft office is widely used across globe, from day to day tasks to complex data processing. To execute these tasks using the macro (vba code), we can execute many manual tasks such as:
Formatting the data in specific formats for all sheets in workbook
-formatting your monthly reports for specific format and arrangement of the data for presentation purpose. Creating charts and formatting colors as per the report requirements. This can be done by writing set of instructions and executing them with click of a button.
Automating the repetitive task
-If you need to collate data from 20 different excel files on daily basis and put it in a template file. Then format this data as per required output. This task can be automated by the macro. For the first time you can record the macro while collating the data, The next time you would just need to execute the macro with one click and all the manual work will be completed by the automated instructions.
Inserting frequently used text
-Say while preparing reports, you need to insert few texts in a standard format for all reports you create, Here we can write macro and assign a shortcut button for it, by pressing which the macro will insert the required text for you. e.g. The product description headers. This will reduce your typing or copy paste time and eliminate the error of manual mistake.
Creating complete vba application
-To create a complete vba application would definitely take some time to understand the coding and input requirements. e.g. you can develop a complete conference room manager application using Excel VBA code, which can be used by the users to book an conference room.
Creating custom functions in VBA
– Apart from the standard functions (sum, count and more) available in Excel, we can create custom functions as per our requirements, very easily using the VBA code. e.g. say we are creating a home loan emi calculator, we can create a functions which will give us the output, based on few inputs for calculations.
There is a large scope of developing macros, automating the complex processes, generating reports and much more. It all depends on how creative you think to solve the problems. That’s all for now, about VBA.
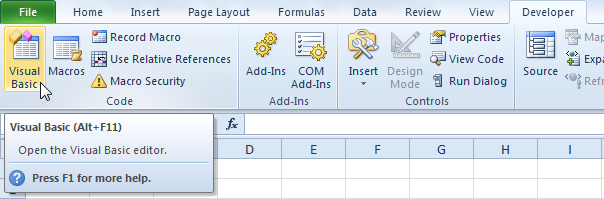
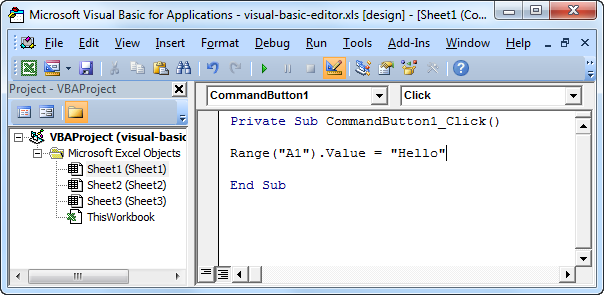
The Visual Basic Editor is the starting point for creating macros in Excel VBA, so it is important to get this configuration right. To launch the Visual Basic Editor in Excel 2010 or Excel 2007, click on Visual Basic (or press Alt+F11).
Below Visual Basic Editor window will open
The left window with the sheet names in it is called the Project Explorer. If you can’t see the Project Explorer, click on View and then Project Explorer. Most probably the Project Explorer will already appear as a column on the left side of the screen. If not, follow the below steps to achieve this:
1. Right click on the Project Explorer
2. Check Dockable (If required)
3. Click on Project – VBAProject and drag the Project Explorer to the left side of the screen
The Code window can be added by clicking on one of the sheet names. To cover the whole screen, you can maximize the Code Window. We feel that this is the best configuration of the Visual Basic Editor.
On the left side of the window under project explorer, you will find 3 folders:
1. Microsoft Excel Objects: All Excel Sheets and workbooks will be available under this folder
2. Forms: Any user forms created in the excl VBA will be available under this folder
3. Module: All created macros will be available under this modules folder
You can add the object or reference libraries with the help of adding VBA references.
1. Go to Tools
2. Click on References
3. Tick the library or references you need to add to execute your macros
5. Right click on Microsoft Excel Objects and Click on Insert –> UserForm
6. A new UserForm will be inserted, adjust the length of the UserForm as required to view the 6 columns.
7. Now add a list box from the VBA Editor Tool Box window. (If you are not able to find the tool box on screen, then Go to View menu on the top–>Click on Toolbox). Adjust the size of the list box to fit the 6 columns of the data table.
8. Add a Command Button on the form we have created. The code to view the data in list box, will go into this command button.
9. Double click on CommandButton1 and this will take us to the vba editor screen of the form. We will be able to see the below code:
Private Sub CommandButton1_Click()
End Sub
10. Copy paste the below code in the CommandButton1 click event.
————————————————————————————————————————–
Private Sub CommandButton1_Click()
With ListBox1
.ColumnCount = 6
.ColumnWidths = “50;70;90;70;70;50”
.RowSource = Sheet1.Range(“A1:F20”).Address
End With
End Sub
————————————————————————————————————————–
11. How this works ?
————————————————————————————————————————–
Private Sub CommandButton1_Click()
‘ below code will work on the Listbox1, which we have added on the form
With ListBox1
‘ We can change the number of the columns we need to view in the list box. In this case we need to view 6 columns.
.ColumnCount = 6
‘Below code defines what will be the column width. We can adjust this column width based on the data requirement.
.ColumnWidths = “50;70;90;70;70;50”
‘In below line we are providing our table data range, which needs to be populated in the Listbox1
.RowSource = Sheet1.Range(“A1:F20”).Address
End With
End Sub
————————————————————————————————————————–
12. Once the code is added, Click on Run button on top menu or press F5 on keyboard.
13. We will be able to see the below form. Here click on command button.
14. Once we click on command button, we will be able to see the below result.
15. The list box here, is used to populate the table data in tabular format. We provided the # of columns, column width and the data range source to the list box. The list box provide an horizontal and vertical scrollbars, based on the data range.
Please feel free to customize this code as per the requirements.
To start with creating the Excel VBA macro, we will create a simple display message macro.
Create Macro:
Using Excel VBA we can automate tasks in Excel by writing macros. A set of VBA code instructions to automate the repeated tasks or complex, time consuming tasks.
1. Press Alt + F11 to view the Visual Basic Editor
2. Select VBAProject(“your excel file name”)
3. Right click on on the name
4. Click Insert — Module
Module – the codes written will be saved in the modules. you can create multiple modules, under same file to manage your codes.
On the blank editor window write below code:
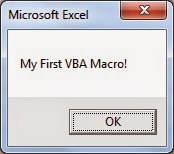
Sub DisplayMessage()
MsgBox “My First VBA Macro!”
End Sub
In above code the DisplayMessage is our macro name. After executing this macro, it will give us a pop-up message with “My First VBA Macro!”.
How to run this macro from Excel :
1. You can assign the code to the command button or any excel object.
2. Insert text box in excel, rename it as Display Message.
3. Right click on text box and click Assign Macro
4. Select this workbook and you will be able to see the macro name created by us
5. Select the macro name
Now if you hover the mouse over the text box, the mouse arrow will change to hand icon which means the text box is now clickable.
Now you can click on the text box and the macro will be executed. You will receive a pop-up message saying, “My First VBA Macro!”
Message box in excel VBA:
The MsgBox dialog box in Excel VBA can be used in many ways to provide the required information to the users. Wherever they need to know and take actions based on that.
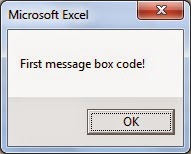
1. Write a simple message in Excel VBA, MsgBox “First message box code”. When executed, it will display the below messagebox:
2. Combining the message box to display the value in the specific cell. If you want to display the updated or changed value in cell B4, we can use the code, MsgBox “The value in cell B4 is ” & Range(“B4”).Value
Here in this code, we have used the & operator to concatenate the text and the value is cell B4.
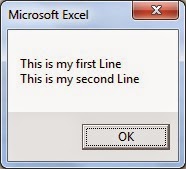
3. Writing the message on the multiple lines we just need to concatenate the text with vbNewLine. for e.g.,
MsgBox “This is my first Line” & vbNewLine & “This is my second Line”
You can use the Msgbox function to provide different messages during the execution of Macro. E.g. Alert Messages, Critical Warning Messages, Decision Making by allowing user to Clik Yes, No or whatever values you want to assign.
I will cover this in another blog on how to use message box for user input during the macro execution. Till then Happy Learning !